print(“a”, “b”, “c”, sep=’\n’)
a, b, c隔行打印
isinstance
isinstance(e.reason, socket.timeout)
是在urllib实例看到的
数组
一个数组(不论是字符型还是数值型),另一个元组引用它,更改新的元组后,旧元组也会改变
’xx’.join([‘a’, ‘b’, ‘c’])
1 | print(’xx'.join(['a', 'b', 'c'])) |
print(*[‘a’, ‘b’, ‘c’])
1 | print(*['a', 'b', 'c']) |
[表达式 for r in x]
得到数组
格式化字符串
- ‘kdjkf%skdk%d’%(‘xxx’, 5)
- ‘{0}dfsef{1}’.format(4, 5)
time
sleep
1
2
3def fun(arg):
print("hello"+ ", %s"%arg)
time.sleep(2)##
进程和线程
threadpool模块
1 | import threadpool |
1 | def hello(m, n, o): |

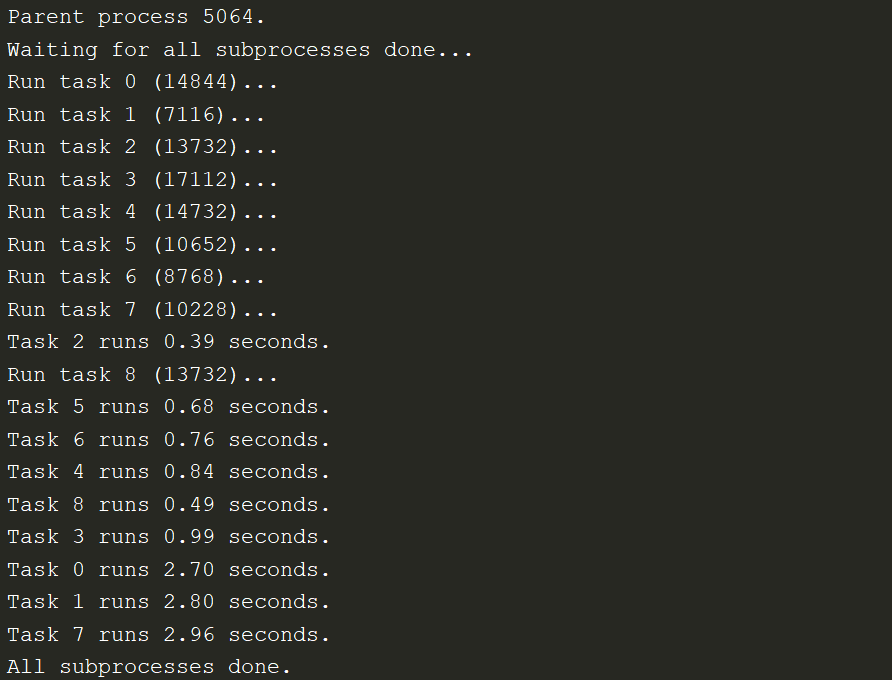
multiprocessing模块
process
适合少量进程
pool
适合大量进程
1 | import os, time, random |
subprocess模块
适用于子进程是外部程序
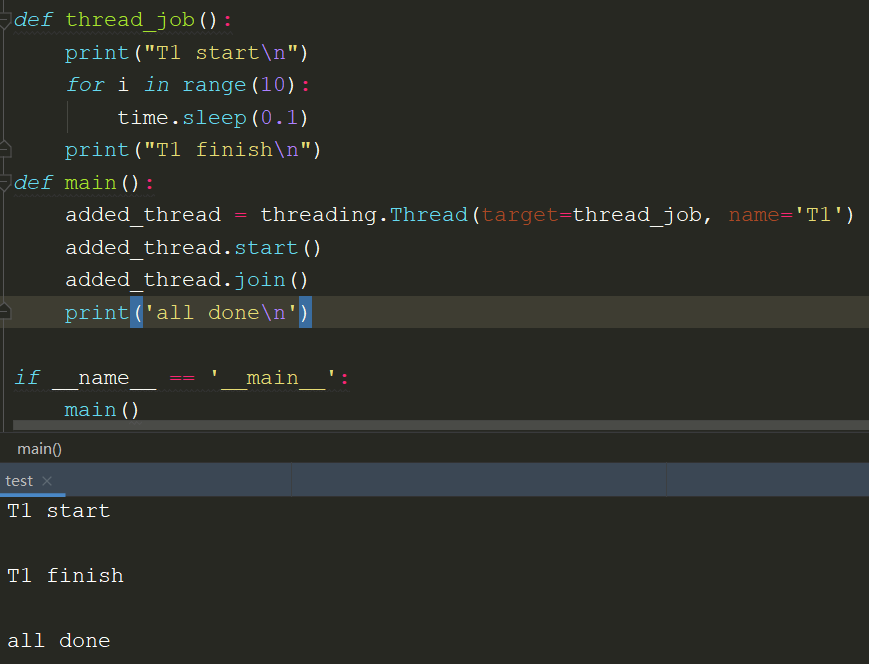
threading模块
1 | def thread_job(): |

join()
用来控制主线程后续任务,在子进程执行完毕后再执行
1 | def thread_job(): |
1 | def thread_job(): |
random
random
1 | import random |
range
1 | def thread_job(): |
1 | li = [xxxxx] |
generator
1 | 1.python yield生成的generator不可以用下标取 |
1 | b = 0 |
Generator长度的获取
1 | len(list(gen)) |
Generator复制
1 | import itertools |
yield
1 | yield不能与return一起用;与if一起用也有问题,直接不进入if(不管if是在生成generator的循环里,还是在函数里的任何位置,都直接不执行) |
cursor
1 | 1.mongodb的find方法生成的cursor可以用下标或去,也可以用下标截取 |
list_iterator
1 | 在使用Beautiful soup进行网页解析时,用find_all查找产生的iterator不是subscriptable |
hasattr, setattr, getattr
hasattr
1 | hasattr(object, name) |
setattr
1 | 给对象的属性赋值,若属性不存在,先创建再赋值 |
getattr
1 | 获取对象object的属性或者方法,如果存在打印出来,如果不存在,打印出默认值,默认值可选。 |
1 | class test(): |
综合
1 | 一种综合的用法是:判断一个对象的属性是否存在,若不存在就添加该属性。 |
Flask库
1 | 1. |
1 | 2. |
钩子函数
1 | 钩子的理解: |
常用的钩子函数
1 | before_first_request:处理第一次请求之前执行。 |
random.randint
1 | randint(a, b) # 返回整数包含a, b |
random.choice
1 | random.choice([xxxx]) # 随机从列表中选择一个 |
list[a:b]
1 | index为b的取不到 |
datetime
1 | import datetime |
1 | (date.today() + timedelta(days=-i)).strftime("%Y-%m-%d") |
时间戳
当前时间
1 | 1.now = datetime.datetime.now() |
指定日期
1 | 1.datetime.datetime.strptime(t, '%Y%m%d') |
1 | # 获取时间戳;2022-03-08 |
时间戳转化为固定格式时间
1 | time.strftime("%Y-%m-%d %H:%M:%S", time.localtime(1648803511)) |
re正则表达式
1 | 1.去除字符串中非数字字符 |
类方法,普通方法,静态方法,类属性,实例属性
1 | 实例可以调用 类方法,普通方法,静态方法 |
1 | 实例方法(普通方法)——————————————————————随着实例属性的改变而改变 |
1 | 类属性:实例也可以访问类属性,但类不能访问实例属性 |
1 | 实例属性属于各个实例所有,互不干扰; |
1 | class o: |
私有属性
1 | self.__name = 'xxxx' |
b””和f””和r””
1 | 1.f" " |
1 | 2.r"" 的作用是去除转义字符. |
1 | 3. |
将列表所有元素整合成字符串
1 | l = [xxxxx] |
邮件功能
发邮件
1 | import smtplib |
163
1 | # coding: utf-8 |
读取邮件
1 | ~~~ |
1 | 可变参数:*args |
1 | 关键字参数:**kwargs |
1 | 命名关键字参数: |
查看实例的属性和方法
1 | dir(0b) |
不见黄河心不死,不撞南墙头不回。