MongoDB存储
[官方文档](http://api.mongodb.com/python/current/api/pymongo/
collection.html)
MongoDB是 由 C++语言编写的非关系型数据库,是一个基于分布式文件存储的开源数据库系统,其内容存储形式类似JSON对 象 ,它的字段值可以包含其他文档、数组及文档数组,非常灵活。
准备工作
安装好pymongo并启动服务
1 | 1.打开mongodb的安装位置,如:E:\web-software\mongo\bin |
连接MongoDB
1 | import pymongo |
指定数据库
1 | db = client.数据库名 |
指定集合
1 | collection = db.集合名 |
插入数据
insert()
1 | # 插入单条 |
insert_one()
1 | ~~~ |
查询
find(), find_one()
1 | from bson.objectid import ObjectId |
随机查询
1 | results = collection.aggregate([ {'$sample': {'size':2000}}]) # 生成生成器 |
比较符
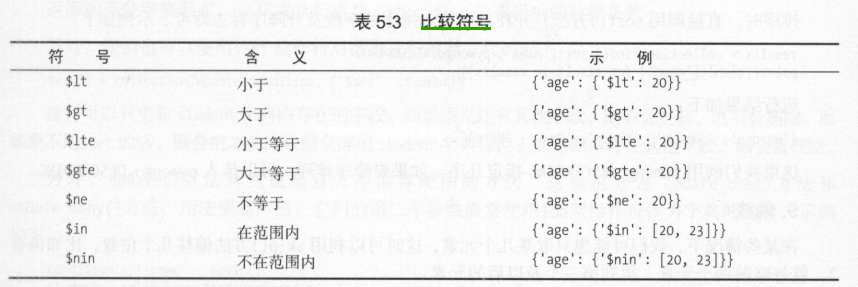
用正则表达式
1 | results = collection.find ({ 'name': {'$ regex':'^M.*'}} ) |
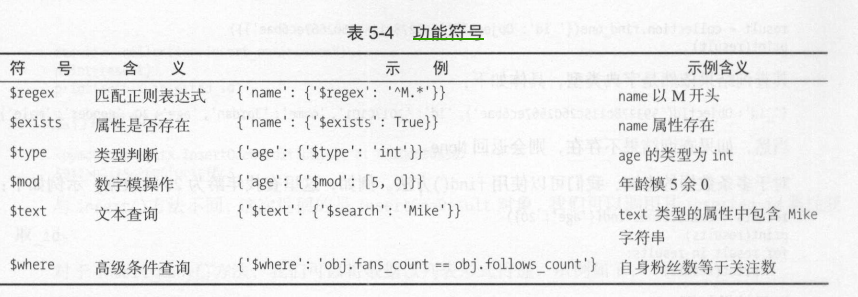
功能符
计数
count()
1 | result = colletion.find().count() |
排序
sort()
1 | results = colletion.find().sort('name',pymongo.ASCENDING) |
这里我们调用pymongo.ASCENDING指定升序。如果要降序排列,可以传入pymongo.DESCENDING
偏移
skip()
1 | results = collection.find().sort('name', pymongo.ASCENDING).skip(2) |
值得注意的是,在数据库数量非常庞大的时候,如千万、亿级别,最好不要使用大的偏移量来查询数据,因为这样很可能导致内存溢出。此时可以使用类似如下操作来查询
limit()
设置结果个数
1 | results = collection.find().sort('name', pymongo.ASCENDING).skip(2).limit(2) |
更新
update()
1 | condition = {"d": 'c'} |
1 |
|
update( ) 方 法 其 实 也 是 官 方 不 推 荐 使 用 的 方 法 。这 里 也 分 为 update_one()方法和updatejnany()方法,用法更加严格,它们的第二个参数需要使用$类型操作符作为字典的键名
update_one()
1 | condition = {'name': 'Kevin'} |
1 | condition = { 'age': {'$gt': 20}} |
update_many()
1 | 如果调用update_many()方法,则会将所有符合条件的数据都更新,示例如下: |
1 | collection.update_many({}, {'$set':{'score':40}}) |
其返回结果是UpdateResult类型。然后分别J调用 matched_count和 modified_count
属性,可以获得匹配的数据条数和影响的数据条数
删除
remove()
1 | colletion.remove(condition) |
delete_one()
1 | collection.delete_one(condtion) |
delete_many()
1 | colletion.delete_one({'age':{'$lt': 25}}) |
它们的返回结果 都 是 DeleteResult类型,可以调用deleted_count属性获取删除的数据条数。
其他操作
另外, PyMongo 还提供了一些组合方法,女口find_one_and_delete()、 find_one_and_replace()和find_one_and_update(),它们是查找后删除、替换和更新操作,其用法与上述方法基本一致。另外,还可以对索引进行操作,相 关 方 法 有 create_index()、 create_indexes()和 drop_index()等。
总结
1 | 1.cursor可以用 [index] |
钟表可以回到起点,但永远不会回到昨天。